5. Setting Up The Camera
Following the 1.4 update, the functionality of the evidence camera has been expanded to give users more options to take and upload photos,
allowing them to select from a configured list of public, job-specific, or password-protected upload channels. In order to use this functionality,
you MUST properly set up your upload channels in your config.lua AND your server/nikon.lua by creating an upload channel for each one in your
config. If you do not do this, screenshot-basic will not be able to upload the photo to your discord and create a URL that can be saved in the database.
Do not edit the LOCAL STORAGE upload channel if you do not know what you are doing. This is the channel used to create the photos for the onboard storage on the camera item, do not use it as your police webhook unless you understand that anyone with a camera item will be able to upload to it.
Setting Up Our Upload Channels
In our config, we will find our Config.Camera table which includes the image spaces or upload channels that will be available in our camera. You can use
the included ones, or edit them to your liking. Each upload space has a few variables which set the various attributes, and we can see them below! Our most
useful one will be the Path, or name, of the image space. This lets our players know what they are uploading too. Next, we can choose to set a password with
the Password variable if we wish to create a secure image space, by default image spaces will be public and anyone who can see them will be able to upload to
them! lastly, we have our Auth, Job, and Type variables which we can use to restrict our image spaces to certain jobs. If you wish to create a multi-job, multi-type
check using the included Config.Auth system in this script you may, or you can simply specify a job name with Job or a job type with Type.
Config.Camera = {
    [1] = {Path = 'LOCAL STORAGE'}, -- do not remove the default upload, this serves as local storage for the camera to save onto the camera item/sd card WITHOUT uploading it
    [2] = {Path = 'NIKOFF IMAGE SPACE', Password = nil}, -- this is a public webhook/image space for civilians to use the camera for, not required but recommended
    [3] = {Path = 'SA_NSS/GENERAL/', Password = nil, Auth = 'LEO'},
    [4] = {Path = 'SA_NSS/DRUGTASKFORCE/', Password = 'password123', Auth = 'LEO'},
    [5] = {Path = 'SA_NSS/INVESTIGATIONS/', Password = 'password1234', Auth = 'LEO'},
    [6] = {Path = 'SA_NSS/MEDICAL/', Password = 'password123', Auth = 'EMS'},
    [7] = {Path = 'WEAZEL_NSS/BREAKING', Password = 'thetruth', Job = 'reporter'}, -- this is a private webhook for the reporter job, you can make job-specific webhooks using this method
}
Next, we must go into our server/nikon.lua and add our webhooks for each of our upload paths that we have created in the config. If you do not add a webhook in the server-side table then your camera will throw an IC notification and an OOC print indicating that the camera does not have a webhook available. This means if you have 8 upload channels you must have 8 webhooks listed in your table, even all 8 upload channels link to the same webhook.
For local storage, it is recommended to set up a webhook that is linked to a channel in your discord only accessible to administrators and staff, this will prevent the potential for players to metagame information from photos taken in game that should only be available to a person who has physical access to the camera which took it.
local Webhooks = { -- these webhooks keys MUST MATCH your config keys
    [1] = '', -- THIS IS REQUIRED TO USE THE CAMERA AT ALL!!!
    [2] = '',
    [3] = '',
    [4] = '',
    [5] = '',
    [6] = '',
    [7] = '',
}
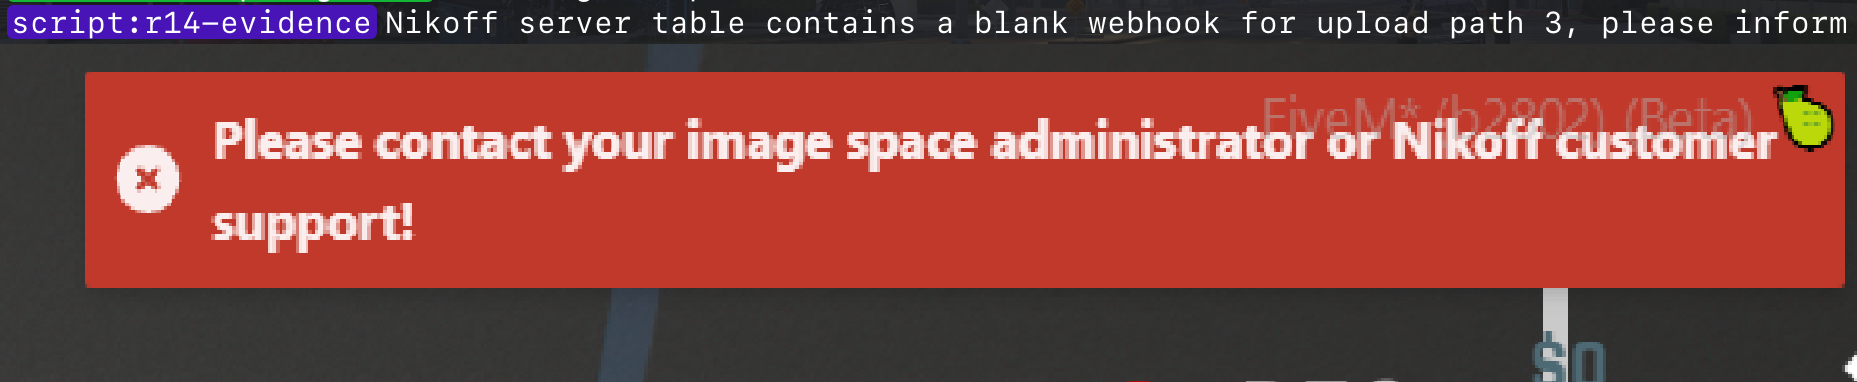
Once you have completed this step, you can navigate to your game where you can make sure your webhooks are functional and accessible. The first step in this process will simply be checking your server console when you either start or restart your script. During the initilzation process for the camera, missing or blank webhooks for upload channels defined in Config.Camera will be printed to your console as shown below.

If you do not recieve any of these prints, you can then proceed to test your webhooks by navigating to your camera. Whenever you use the Nikoff G600 item, your viewfinder will briefly display both the keybind for opening the camera menu (E), as well as the upload channel currently selected in the camera settings. For new cameras, this will always be LOCAL STORAGE or the first image space defined in your Config.Camera table if you have modified it.
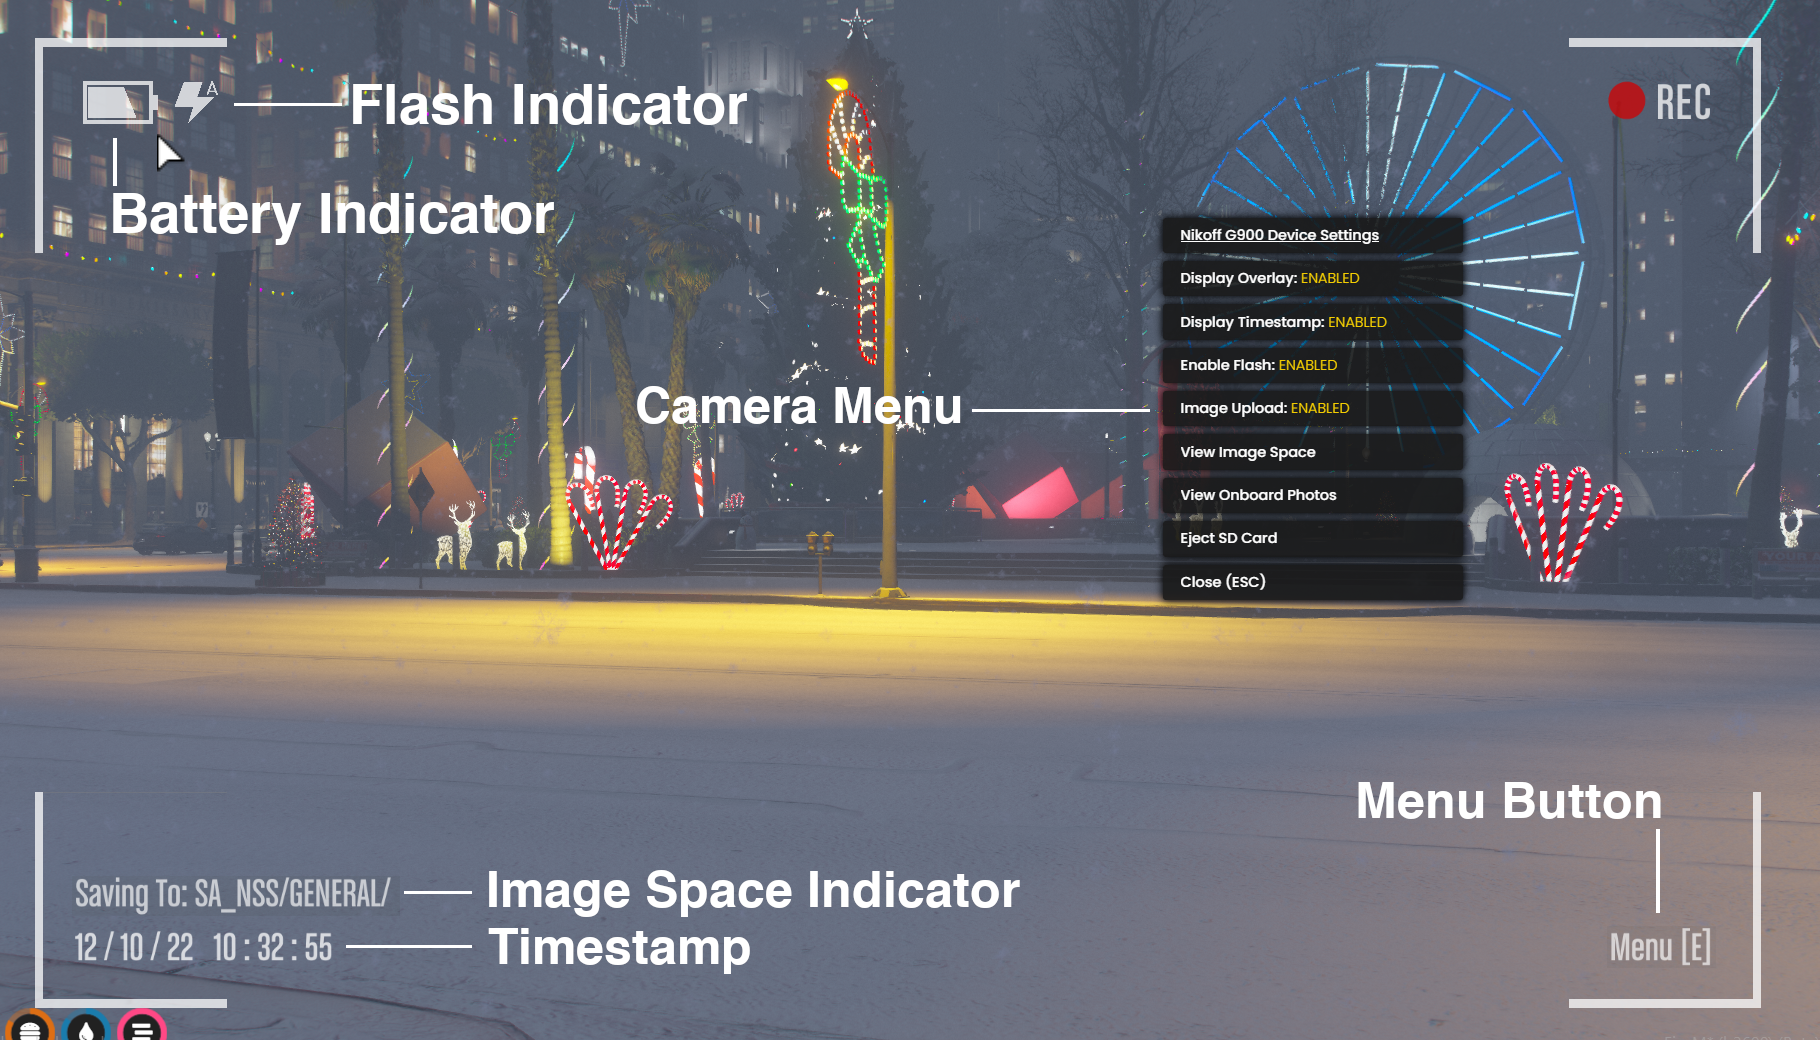
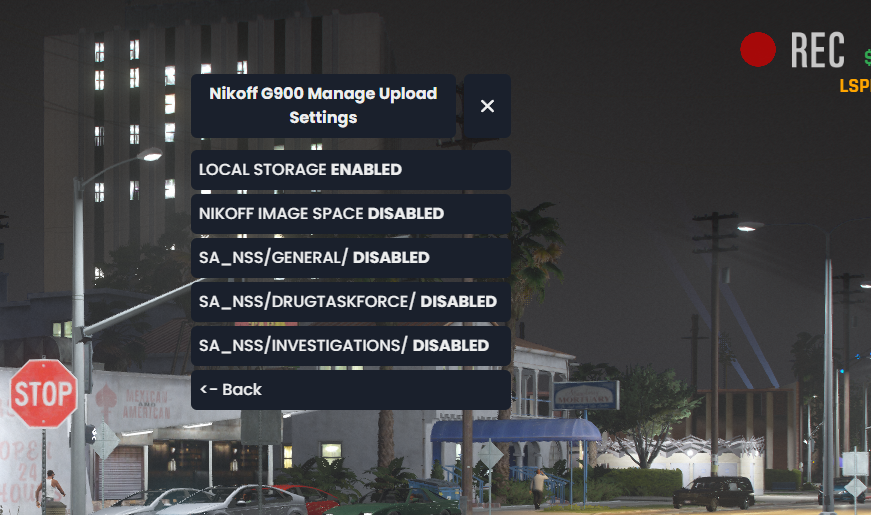
Once you have opened your device settings, click on the Image Upload box in order to set the desired upload channel for your camera, you will be presented with a list of all available
image spaces to YOUR CHARACTER. This means that if an image space is restricted by a job or job authorized function in the script, it will not appear in this menu unless you have it. For
this example, the Weazel News Secure Image Space that is setup by default is not visible to the police character using the camera below.
After selecting your image space, you can attempt to take a photo, and if the webhook is functioning it will automatically upload to your discord channel, save the image to the camera item, and upload it to the shared image space accessible from the device settings menu on the camera. If you are not able to upload it, you will get an error notification telling you to contact customer support in character as well as a print in the client F8 console that will inform you that your webhook is blank and not accessible for the camera to use.